While learning the essential elements and harmonies is critical while playing the guitar, the most enjoyable moment is when you can begin strumming. You might be able to start strumming songs you know with a bit of effort and correct technique sooner than expected.
This article will walk you through step-by-step directions on how to strum a guitar.
Step 1: Learning to Play the Guitar – how to strum a guitar
Hold the instrument correctly
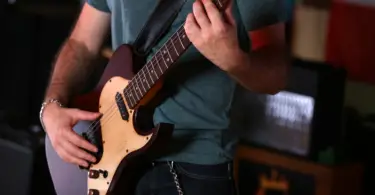
Maintain a firm grip on the guitar and keep it positioned on your thighs. To understand how to strum the guitar effectively, place your strumming hand’s elbow out from the reach of the strings towards the bottom of the guitar so that you can utilize your wrist to strum. Then, with your fret fingers, grasp the guitar neck. You must place your thumb just beyond the middle of the neck.
It’s tough to strum if you’re using your arms to support up the guitar. So instead, allow the guitar to settle on your lap, anchoring it with your elbow, and ensure that you can shift your strumming fingers without disturbing the guitar.
Hold the pick correctly
Bend all of your fingers in toward your palm with your palm towards your body. Put the pick on the very first knuckle of your pointer finger and direct it straight at your chest. Grasp it tightly with your thumb, leaving barely a few millimeters of space between it and your finger. Play around with the pick a little until you get a comfortable grip on it.
You may also strum without the need for a pick using the thumb of a non-fretting hand. Johnny Cash never played with a pick. That decision is dependent on whether you can produce a pleasing clear sound with your fingertips. Practice using a pick and then discard it if you find it too hard and prefer the sound of your fingertips on the strings. It might be uncomfortable on your strumming fingers if you don’t use a pick. Gradually building calluses, on the other hand, is always a positive thing.
Familiarize yourself with the guitar’s motion
A guitar’s sound relates to the level of the strings, something off the fretboard, and the strength required in your fretting finger to play the strings. Keep playing chords until you create a clean sound on all of the strings at the same time.
If you hit “dead strings” that aren’t fully fretted, your strums will sound bland. It isn’t delightful to begin learning to strum if you form your chords incorrectly. Stop strumming and rearrange the chord if your strum seems flat or rattled.
Step 2: Strumming correctly – how to strum a guitar
Strumming the strings in-between soundhole and the bridge is a good idea
Strumming the strings in different locations will help you obtain a sense of the sound it produces. For example, strumming exactly over through the soundhole produces a “bassier,” “boomier” sound, but strumming halfway to the bridge produces a sharper, tinnier tone.
Although there is no “right place” to strum, you may want to experiment and focus your strum approximately an inch southward of the soundhole. Then, play about with your guitar to figure out wherever you like the sound the most.
Strumming all of the guitar’s strings at the same time is a good idea
Try playing a basic first-position chord, such as a G chord, using downstrokes over time. Play quarter notes with one strum on every string, attempting to strike all of them. Maintain pace by hitting four strums every measure.
Strumming all the strings with equal power, beginning with a low E string. It might be tough at first to try and sound like a “chord,” with all the strings ringing in unison. So beginners prefer to strike either the first or last E string a little hard.
Try using upstrokes
Once you’re confident doing it on time, try playing the guitar from the low E string to the high E string. It is known as an upstroke. It can be a little more challenging, but you should still work hitting all the strings somewhat evenly, allowing the chord “thrum” out as one large sound instead of scraping over them all separately and slowly.
Make use of your wrist.
The flopping of the strumming arm quickly identifies a newbie. Use your wrist rather than your elbow when you strum.
Many beginning guitarists struggle to keep the pick in place when trying to strum.
Most pick issues are caused when you tightly hold the pick’s base and allowing it to bounce around.
Make sure you’re gripping it correctly, with only the tip of the point protruding from your fingers.

Step 3: Understanding Basic Patterns
Learn the up-down alternate beat
The most straightforward fundamental rhythmic strumming pattern is to switch down and upstrokes with each beat: (DUDUDUDU) Down-Up, Down-Up, Down-Up, Down-Up, Down-Up. Maintain the same speed, but attempt a down-up strum on each beat, splitting the quarter notes into eighth notes.
Rather than one stroke each beat, you will have two strokes per beat. So it is the eighth note. It’s about the same speed, so continue stamping your foot at the same rate, then strum twice for each beat.
Alter the chords
Change it up once you’ve become used to your downward strokes and upstrokes solely on a single chord. For example, change from a G to a C chord each measure, then every two beats, to practice shifting chords in time.
Take your time studying this and assimilating the changes. It may be very slow at first, but you will be better as you put the effort each day.
Going on to the next stage before you’re confident changing chords will be difficult and disheartening.

Remove the fourth downstroke from the measure
Little to no songs have a straight-up-down pattern, and repeating the same way would be tedious. So instead, remove one downstroke and observe how the pattern changes: (DUDUDU-U). Play nothing in which you would have hit the downstroke.
To begin learning more complex strumming patterns, you must first learn how to leave off some up and down strokes while retaining the same up and down the rhythm in your fingers. In other words, you’ll keep rotating your wrist while keeping the pick off the strings.
Experiment with the pop-rock pattern
A common strum pattern heard at many open-mics and training workshops is (D-D-U-U-DU).
Begin by deliberately listening to your favorite tunes that use acoustic guitar significantly to gain a sense of the strumming rhythm employed. Then, now that you’ve mastered the fundamentals, you may practice varying your strumming patterns by leaving out specific strokes to produce varying effects in the song.
Experiment with dampening the strings with your strumming hand
Another technique to spice up your strumming patterns is learning to damp the strings with the base of your strumming hand, allowing you to keep the rhythm but obtain a more percussive sound when you hit the strings with your pick.
Neil Young has a characteristic bottom-heavy strumming pattern which he employs in conjunction with string damping. In contrast, acoustic guitarist-surfer-pop star Jack Johnson has a unique damp-strumming approach that is simple to learn and seems more satisfactory
Place the chord and tempo first
Amateur guitar players frequently “over-strum,” concentrating much more on the pattern they acquired and less on the pace, chord clarity, and song playing. When strumming, try to focus first on the chords and the strumming rhythm. In no time, you’ll play like a pro.
Begin playing music
It’s a lot more enjoyable to play guitar when you’re strumming chords patterns and songs you love! To begin with, a simple piece that teaches you key strumming patterns.
You can perform nearly any traditional and folk song using first position chords G, C, and D. Choose a few to study and play to have the strumming patterns down.
Depend on the number of strings to strum and the chords you need to play in a song you want to learn. D Major, for instance, requires just five strings to be strung, but G Major demands all six.
Conclusion
Learning how to strum a guitar is not easy; it will take some time with effort and patience.
You may find it annoying if you will not get your desired sound on the first try, but with practice and hard work, you will become used to it, and once you adjust your fingers to the strings and the strumming pattern; you will eventually play effectively and like a pro.